Building a walk in meat cooler is very different from building a general-purpose walk in cooler. Meat storage demands tighter temperature control, proper airflow, hygiene-focused design, and long-term reliability. Mistakes that might be acceptable in a beverage or produce cooler can quickly lead to spoilage, health code violations, or significant financial loss when meat is involved.
This guide is written from a real-world, industry-insider perspective, aimed at butchers, restaurant owners, processors, hunters, and anyone planning to build a dedicated walk-in meat cooler. The focus is not just on “how to assemble panels,” but on how to build a system that performs correctly day after day.
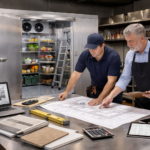
Planning & Site Selection
The success of a walk-in meat cooler starts long before the first panel is installed. Planning and site selection determine not only cost, but also long-term usability and compliance.
A meat cooler must be located in an area that supports consistent temperature control and clean workflow. Ideally, it should be close to where meat is received, processed, or broken down, while remaining isolated from heat-producing equipment such as ovens, fryers, or dishwashers. Excess ambient heat increases refrigeration load and shortens equipment life.
Local health codes and building regulations should be reviewed early. Meat storage is usually classified as high-risk food handling, which can impose stricter rules for temperature monitoring, sanitation, drainage, and materials. Some jurisdictions require floor drains, washable wall surfaces, or specific clearance distances for cleaning and inspection access.
Workflow matters just as much as code compliance. A well-planned meat cooler supports a logical flow: receiving → inspection → storage → processing → dispatch. Poor layout leads to unnecessary door openings, cross-contamination risk, and temperature instability. Each additional door opening introduces warm, moist air, increasing frost buildup and compressor workload.
Electrical supply and ventilation must also be considered. Refrigeration systems need dedicated circuits, proper grounding, and adequate airflow for heat rejection. Ignoring these basics often results in nuisance shutdowns or poor performance.
Determining Required Size & Internal Layout for Meat Storage
Sizing a walk-in meat cooler is not about guessing square footage. It is about volume, weight, and airflow.
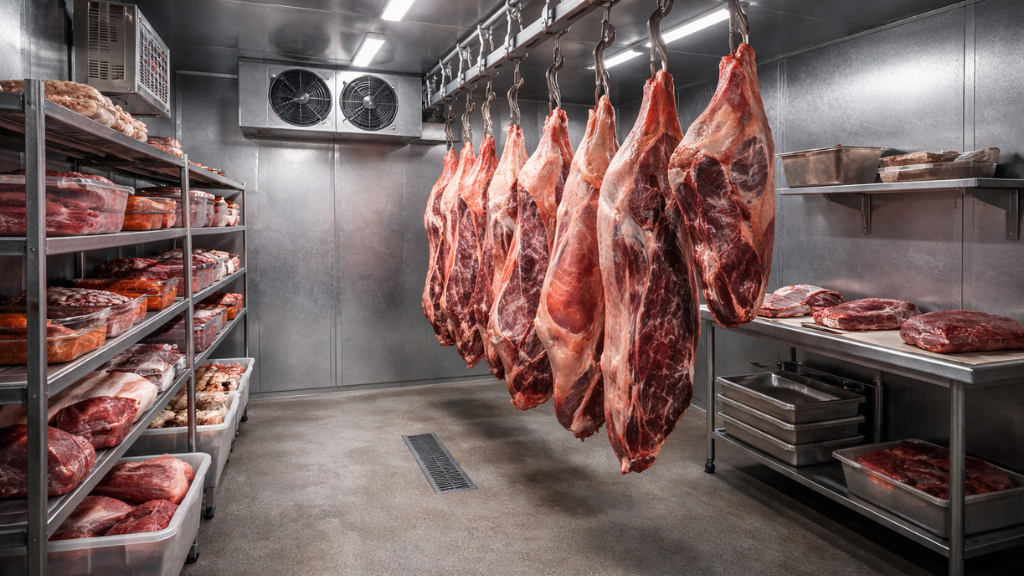
Meat is dense and heavy. Unlike beverages or produce, it cannot be tightly stacked without blocking airflow. A common rule of thumb is to plan storage based on pounds of meat per cubic foot, leaving sufficient space around each product for cold air circulation.
If the cooler will store boxed meat, shelving layout becomes critical. Shelves must be spaced to allow airflow above, below, and behind the product. Overloading shelves may seem efficient, but it leads to uneven temperatures and localized spoilage.
For hanging meat or carcasses, ceiling height and structural support become key factors. Rails, hooks, and support beams must be rated for the expected load. Adequate spacing between hanging cuts is essential to prevent warm spots and surface condensation.
Internal circulation paths should be planned deliberately. Staff must be able to move safely while maintaining clear airflow channels. Narrow aisles may save space but often compromise temperature stability and sanitation.
Future growth should also be considered. Building a cooler that is “just big enough” today often leads to problems when volume increases. Expanding later is far more expensive than building slightly larger at the start.
Structural Build
The structural components of a walk-in meat cooler define its efficiency and durability. This is where shortcuts become expensive over time.
Insulated panels are the core of the system. High-quality polyurethane foam panels with sufficient R-value are essential. Meat coolers benefit from thicker insulation because they must maintain narrow temperature ranges, often between 34°F and 38°F, with minimal fluctuation.
Panel joints must be airtight. Cam-lock systems are commonly used, but correct installation is critical. Any air leakage allows warm, moist air to enter, leading to condensation, ice buildup, and energy loss.
Flooring is often underestimated. Meat coolers experience moisture, cleaning chemicals, and heavy loads. Floors should be non-porous, slip-resistant, and able to support rolling carts or hanging rails. Thermal breaks between the floor and ground slab prevent condensation and frost heave.
Vapor barriers play a major role in long-term performance. Without proper vapor control, moisture migrates into insulation, reducing its effectiveness and eventually causing panel failure.
Corners, penetrations, and ceiling joints deserve special attention. These are the most common points of air leakage and thermal bridging.
Refrigeration & Cooling System Selection for Meat Coolers
The refrigeration system is the heart of the meat cooler. Selecting the wrong system leads to temperature swings, high energy costs, and frequent breakdowns.
Meat coolers typically require more precise temperature control than general storage coolers. The system must handle frequent door openings, high product load, and moisture introduced during loading and cleaning.
Self-contained refrigeration systems are simpler to install and often sufficient for small or DIY projects. They are compact and cost-effective, but they release heat into the surrounding space, which may not be ideal in tight kitchens.
Remote condenser systems separate the heat-generating components from the cooler. They are more expensive to install but offer better performance, reduced noise, and lower ambient heat inside the workspace.
Humidity control is especially important for meat storage. Excessively dry air leads to product weight loss and surface drying, while excessive humidity promotes mold and bacterial growth. Proper evaporator sizing and defrost strategy help maintain balance.
Temperature monitoring should include accurate sensors and, ideally, alarms. Meat storage leaves little room for error. A system failure overnight can destroy thousands of dollars in product.
Doors, Seals & Access Points
In a meat cooler, the door is both the most-used component and the weakest thermal point.
Door selection should be based on traffic frequency and hygiene requirements. Standard hinged doors are common, but high-traffic environments may benefit from reinforced doors or strip curtains to reduce air exchange.
Door seals must be high-quality and regularly inspected. Even small gaps dramatically increase energy consumption and frost formation. Magnetic gaskets should create uniform contact around the entire frame.
Automatic door closers are strongly recommended. A door left ajar for even a few minutes can raise internal temperatures significantly and introduce moisture.
Access points such as drains, sensor penetrations, or service ports must be sealed carefully. Poorly sealed penetrations undermine the entire insulation system.
From a sanitation standpoint, door surfaces and handles should be easy to clean and resistant to corrosion from cleaning chemicals.
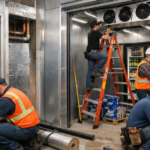
Walk in Meat Cooler Installation
Even the best-designed meat cooler will fail if installation and maintenance are neglected.
Installation should follow a logical sequence: floor preparation, panel assembly, sealing, refrigeration mounting, electrical connection, and final sealing. Rushing this process almost always leads to leaks or misalignment.
Once installed, the system must be tested under real operating conditions. Temperature pull-down time, recovery after door opening, and uniformity across the space should all be verified.
Calibration of thermostats and sensors is essential. An uncalibrated system may display safe temperatures while actual product temperatures remain unsafe.
Ongoing maintenance is not optional. Regular cleaning of evaporator coils, inspection of door seals, and monitoring of defrost cycles prevent most common failures. Moisture buildup and ice accumulation are early warning signs that should never be ignored.
Training staff to use the cooler correctly is part of maintenance. Overloading, blocking airflow, or leaving doors open are operational errors that shorten equipment life.